
Handyman Naperville IL is a skilled professional who enjoys working with his hands and seeing the immediate results of his work. He often works with other tradespeople, such as electricians, plumbers, and security systems installers.
Playing to your strengths is the key to success as a handyman. Ensure you’re pricing your services appropriately by claiming your business page on Nextdoor.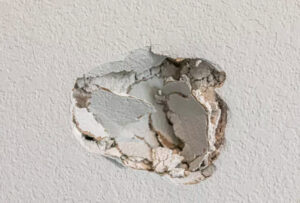
Drywall is pretty tough stuff, but it’s not indestructible. Over time, it can sustain ugly cracks or holes that make a home look drab and outdated. Fortunately, minor blemishes are relatively simple to conceal. Even so, drywall repair requires careful attention to detail to ensure that the patching looks “invisible.”
The first step in drywall repair is gathering the right materials. For a small nail hole, you might need nothing more than spackle or joint compound (aka “mud”) and a putty knife. However, a bigger hole may require mesh drywall tape to strengthen and hold the mud in place. Once you have the mud and tools, you can start repairing the damage.
If you have a wall or ceiling with an obvious hole, begin by scraping away any loose drywall and cleaning the area around the hole. Then, apply a thin coat of paste or compound to the surface of the drywall, and smooth it with your putty knife until it’s flush with the rest of the wall. Allow the mud to dry completely before applying two or three more thin layers, as needed.
Next, you’ll need to prepare the wall or ceiling for a fresh coat of paint. This is a good opportunity to touch-up the rest of your walls or ceiling, too. Be sure to choose a paint that matches the original color and sheen of the drywall.
Depending on the severity of the damage, you might need to replace a section of the drywall. This can be a tricky job because you need to know how to cut drywall without affecting the structure of the house, and you have to take into account electrical or plumbing wiring.
Before attempting a major drywall repair, it’s a good idea to consult an expert to see if the issue warrants a professional’s help. For example, cracks that run across the width of a wall or ceiling aren’t just unsightly; they might indicate a structural problem or a leak.
The average handyman charges between $50 and $100 per hour for drywall repair. However, the exact rate depends on a number of factors, including the size and scope of the project, location and accessibility, and necessary materials.
Repairing a Cracked Drywall Joint
Cracks in drywall occur in walls for a variety of reasons. Most are cosmetic and can be repaired with lightweight spackling compound or drywall mud. The most common cracks are near seams, where drywall panels meet. A home inspector will note them during a home inspection and may recommend repair. They can also be caused by shifting of a house’s foundation or structural problems with the interior walls. These cracks can be difficult to spot unless the homeowner is trained to look for them, and they usually require professional help from a qualified handyman or a structural engineer.
It’s important to properly repair a cracked drywall joint to prevent the crack from reappearing later. The first step in the process is to remove all of the loose spackling compound or mud. It’s best to use a utility knife with a wide blade for this, rather than the kind of narrow putty knife you would typically use on wood filler. Once all of the old mud is removed, apply a fresh coat of drywall joint compound to both sides of the crack. Make sure to use a pre-mixed drywall compound rather than spackle, which will go on more smoothly.
If a crack in a drywall seam appears after applying a new layer of joint compound, it is likely that the original tape wasn’t bedded properly into the mud. This can cause air pockets, which are the perfect place for cracks to start appearing at drywall seams. To fix this, cut away the existing paper tape and re-bed the new tape in the mud along the entire seam.
Drywall mud takes several hours to fully cure, so it’s important not to rush the process. Taking your time with this job will ensure that the crack is properly repaired and that you’ll be able to paint over it without any unsightly splotches or bumps.
Larger cracks in a drywall wall may require reinforcement with mesh prior to spackling. This will stop the crack from reappearing after the spackling dries, as it tends to do in many homes.
Repairing a Stained Drywall Joint
Whether it’s from rain, a leaky sink or a burst pipe, water damage can be quite destructive. In addition to causing mold and mildew, it can also cause structural issues for your home. Fortunately, a professional handyman is experienced in dealing with these problems and can take the necessary steps to restore your home’s safety and integrity.
A handyman is an expert in a variety of trades and repairs tasks that are too small for a general contractor or too complex for a plumber or electrician. They often have on-the-job training and shadow a senior handyman until they can complete the work independently. They can repair anything from electrical appliances and fixtures, to plumbing issues, roofing repairs and painting jobs. Many handymen are also able to take on multiple projects at once, increasing their income and overall productivity.
Staining from a water leak in drywall is an extremely common issue that can occur in both residential and commercial properties. The good news is that it’s an easy fix if caught quickly enough. Handymen can make this repair by first removing any affected areas of the drywall and then sealing the stains with an oil-based stain killer that’s similar to paint. Once the stains are treated, they can apply a new coat of drywall compound.
Before you start repairing the damaged area, measure the wall to determine how much new drywall is needed. Once you have the measurements, cut a piece of new drywall to fit the space. You can use a utility knife or drywall saw to make the cuts. Then, attach the new drywall to the studs using drywall screws and a power drill. Once the drywall is in place, apply fiberglass joint tape over the seams to protect them from future moisture. Next, apply a layer of setting-type drywall compound over the tape and skim it thin to prevent dislodging or damaging the joint tape.
Lastly, sand the joints with a sanding block to smooth out the seams and make sure the surface is even. Finally, apply a final coat of compound over the sanded surface and let it dry completely before painting. The process is a little more time-consuming than simply covering up the damaged area, but it’s an effective way to extend the lifespan of your drywall and save you money in the long run.
Repairing a Broken Drywall Joint
While small holes and dents can be filled with lightweight spackle or joint compound and a putty knife, larger ones require more support and heavier mud. Using the correct techniques ensures that your repair is strong and will last.
For large drywall repairs, you can use a variety of drywall patch kits that contain a reinforced center panel surrounded by self-sticking tape. These are ideal for repairing larger holes in walls that will be painted. They are also useful for repairing cracks that may be caused by changes in the humidity. Studies have shown that humidity causes wood framing and drywall sheets to expand or shrink at different times, which can cause cracking. By acclimating building materials to the humidity level of the room before installing them, you can help prevent cracking.
If you are repairing a crack in a drywall seam, it’s important to make sure that the new joint tape is fully bedded in the mud before proceeding. This will prevent future occurrences of the cracking that may occur due to a poorly bedded tape. To properly bed the joint tape, you will need to cut away any blemishes on the surface of the old tape and apply fresh mud to the entire area.
For smaller holes in drywall, you can use a small amount of drywall compound or spackle and a piece of paper tape to bridge the hole. However, be aware that small holes are more likely to come back and need to be repaired with a drywall patch rather than simply bridging the gap with a piece of tape.
Once the drywall compound or spackle has dried, sand it lightly with a sanding block to remove any ridges and blend the edges of the patch with the wall. Smoothing the mud also helps to prevent the patch from standing out on the wall. After sanding, you can prime and paint the patch to match the color of the rest of the wall.
When sanding drywall, it is important to use a dust mask or a respirator to protect yourself from the fine gypsum and silica particulates in the mud. The fine particles can irritate your lungs and lead to respiratory problems.